![]()
CKA PDF Dumps | Apr 19, 2026 Recently Updated Questions
CKA Exam Questions – Valid CKA Dumps Pdf
The CKA exam is designed to test the candidate's ability to deploy, configure, and manage Kubernetes clusters. CKA exam is a hands-on, performance-based test where the candidate must complete a set of tasks within a given time frame. The tasks include creating and managing clusters, pods, services, and deployments, troubleshooting issues, and securing the Kubernetes environment.
The Certified Kubernetes Administrator (CKA) program is a certification program offered by the Linux Foundation. It is designed to validate the skills and knowledge of IT professionals who can operate Kubernetes clusters. The program is designed for individuals who want to demonstrate their expertise in deploying, configuring, and managing Kubernetes clusters. Certified Kubernetes Administrator (CKA) Program Exam certification exam is a rigorous and challenging test that requires a deep understanding of Kubernetes architecture, configuration, and troubleshooting.
NEW QUESTION # 30
You must connect to the correct host.
Failure to do so may result in a zero score.
[candidate@base] $ ssh Cka000060
Task
Install Argo CD in the cluster by performing the following tasks:
Add the official Argo CD Helm repository with the name argo
The Argo CD CRDs have already been pre-installed in the cluster
Generate a template of the Argo CD Helm chart version 7.7.3 for the argocd namespace and save it to ~/argo- helm.yaml . Configure the chart to not install CRDs.
Answer:
Explanation:
Task Summary
* SSH into cka000060
* Add the Argo CD Helm repo named argo
* Generate a manifest (~/argo-helm.yaml) for Argo CD version 7.7.3
* Target namespace: argocd
* Do not install CRDs
* Just generate, don't install
# Step-by-Step Solution
1## SSH into the correct host
ssh cka000060
## Required - skipping this = zero score
2## Add the Argo CD Helm repository
helm repo add argo https://argoproj.github.io/argo-helm
helm repo update
# This adds the official Argo Helm chart source.
3## Generate Argo CD Helm chart template (version 7.7.3)
Use the helm template command to generate a manifest and write it to ~/argo-helm.yaml.
helm template argocd argo/argo-cd \
--version 7.7.3 \
--namespace argocd \
--set crds.install=false \
> ~/argo-helm.yaml
* argocd # Release name (can be anything; here it's same as the namespace)
* --set crds.install=false # Disables CRD installation
* > ~/argo-helm.yaml # Save to required file
# 4## Verify the generated file (optional but smart)
head ~/argo-helm.yaml
Check that it contains valid Kubernetes YAML and does not include CRDs.
# Final Command Summary
ssh cka000060
helm repo add argo https://argoproj.github.io/argo-helm
helm repo update
helm template argocd argo/argo-cd \
--version 7.7.3 \
--namespace argocd \
--set crds.install=false \
> ~/argo-helm.yaml
head ~/argo-helm.yaml # Optional verification
NEW QUESTION # 31
You have two Kubernetes deployments running in different namespaces, 'namespace-A' and 'namespace-B'. You need to allow communication from pods in 'namespace-A' to a specific pod in namespace-B'. How can you achieve this using NetworkPolicies?
Answer:
Explanation:
See the solution below with Step by Step Explanation.
Explanation:
Solution (Step by Step) :
1 . Create a NetworkPolicy in namespace-R:
- Create a NetworkPolicy in 'namespace-R that allows traffic to the specific pod in 'namespace-B'.
- Code: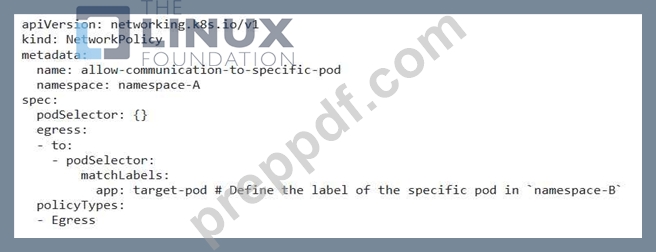
2. Ensure the Target Pod has the Correct Label: - Ensure that the specific pod in 'namespace-B' has the label 'app: target-pod'. 3. Apply the NetworkPolicy: - Apply the NetworkPolicy using 'kubectl apply -f networkpolicy.yaml' .,
NEW QUESTION # 32
have a Kubernetes cluster with limited resources. You have two Deployments: 'app-a' and 'app-b'. Both Deployments require the same resource limits (CPU and memory) but have different resource requests. 'app-a' requests 500m CPU and 512Mi memory, while 'app-b' requests 1000m CPU and IGi memory. When you create a new Pod for 'app-a', it gets scheduled successfully, but when you try to create a new Pod for 'app-b' , it fails to schedule. Explain why the Pod for 'app-b' fails to schedule, and suggest a solution to resolve the issue.
Answer:
Explanation:
See the solution below with Step by Step Explanation.
Explanation:
Solution (Step by Step) :
1. Understanding the issue: The Pod for 'app-b' fails to schedule because it requests more resources (1000m CPU and IGi memory) than are currently available in the cluster. The scheduler prioritizes Pods that can fit within the available resources, and since 'app-b' exceeds the available resources, it cannot be scheduled.
2. Solution: You can solve this issue by either:
a) Increase Cluster Resources: The most straightforward solution is to increase the resources available in your Kubernetes cluster. This could involve adding more nodes with more CPU and memory or upgrading existing nodes with more powerful hardware.
b) Adjust Resource Requests for 'app-b': If increasing cluster resources is not an option, you can try to adjust the resource requests for 'app-b' to match the available resources. You could reduce the CPU request from 1000m to 500m and the memory request from IGi to 512Mi. This would allow 'app-b' to fit within the available resources and be scheduled. However, reducing resource requests could potentially impact the performance of app-b', so it's important to monitor its performance after the adjustment.
3. Implementation (Example Code):
- Option a (Increase Cluster Resources):
- This involves managing your Kubernetes infrastructure.
- Depending on your Kubernetes setup, you may need to use commands like 'kubectl scale' or 'kubectl apply -f deployment.yamr to manage the deployment of your application.
- For detailed instructions on how to manage your cluster, consult your cluster provider's documentation or the Kubernetes documentation.
- Option b (Adjust Resource Requests):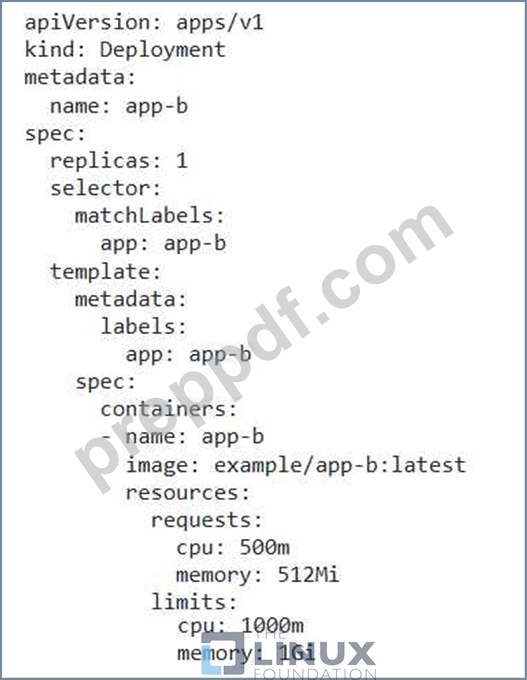
4. Verification: After implementing either option, you can verify the scheduling by creating a new Pod for 'app- b'. If the Pod is scheduled successfully, the solution has been implemented successfully.
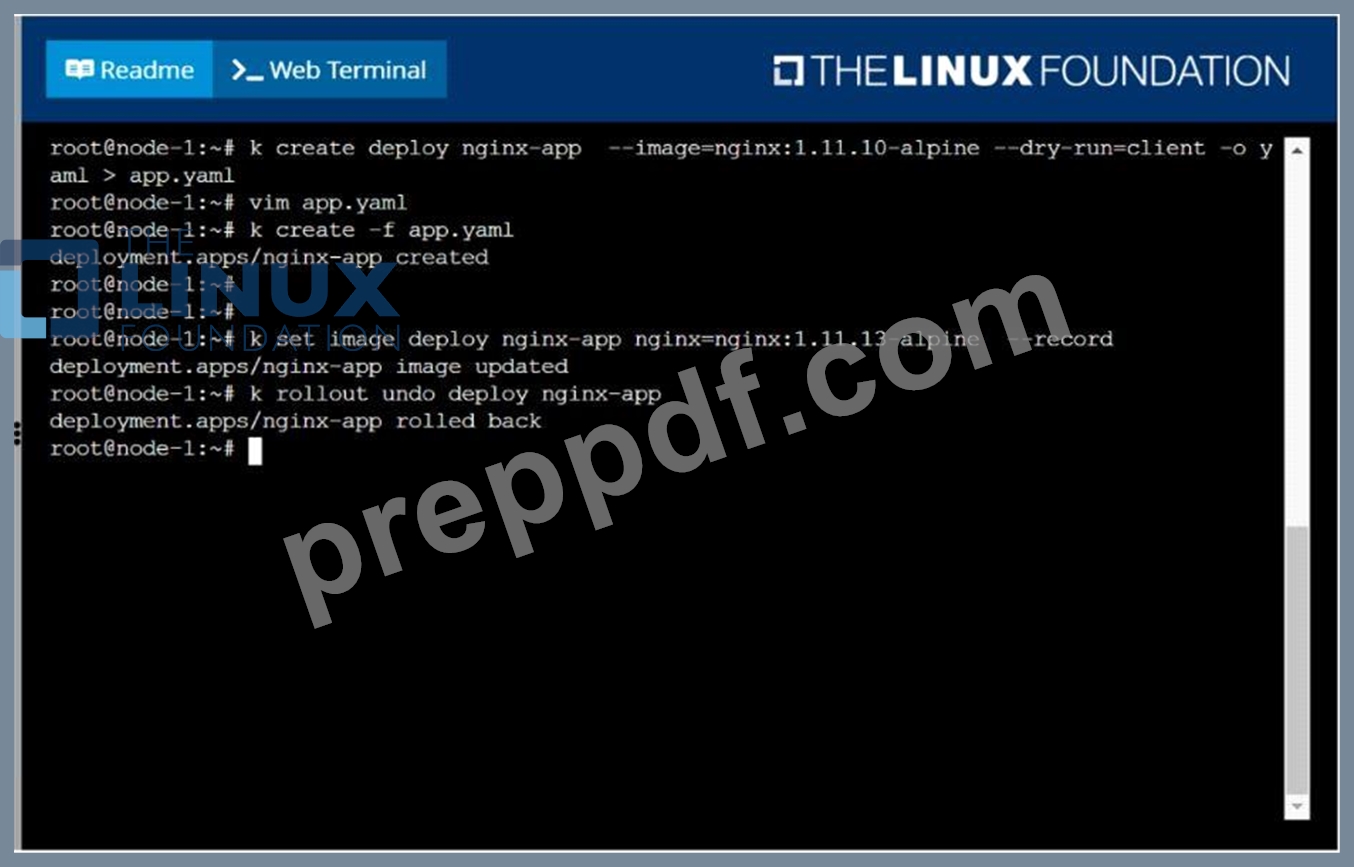
NEW QUESTION # 33
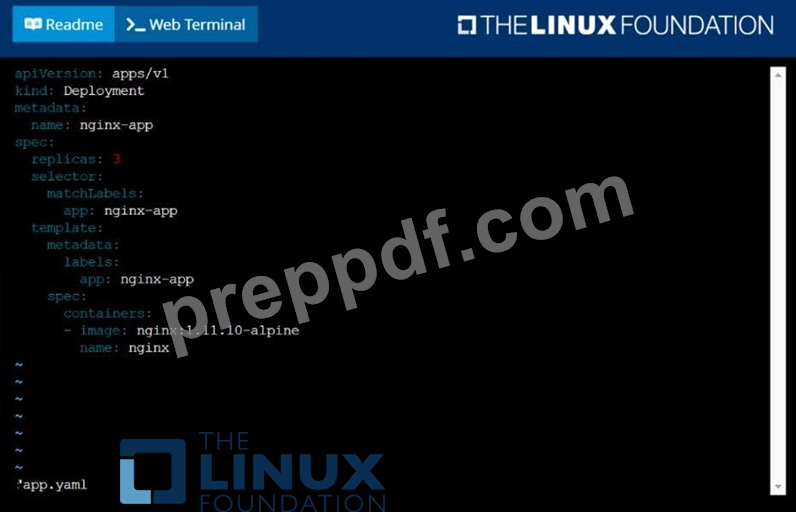
Create a deployment as follows:
Name: nginx-app
Using container nginx with version 1.11.10-alpine
The deployment should contain 3 replicas
Next, deploy the application with new version 1.11.13-alpine, by performing a rolling update.
Finally, rollback that update to the previous version 1.11.10-alpine.
Answer:
Explanation:
solution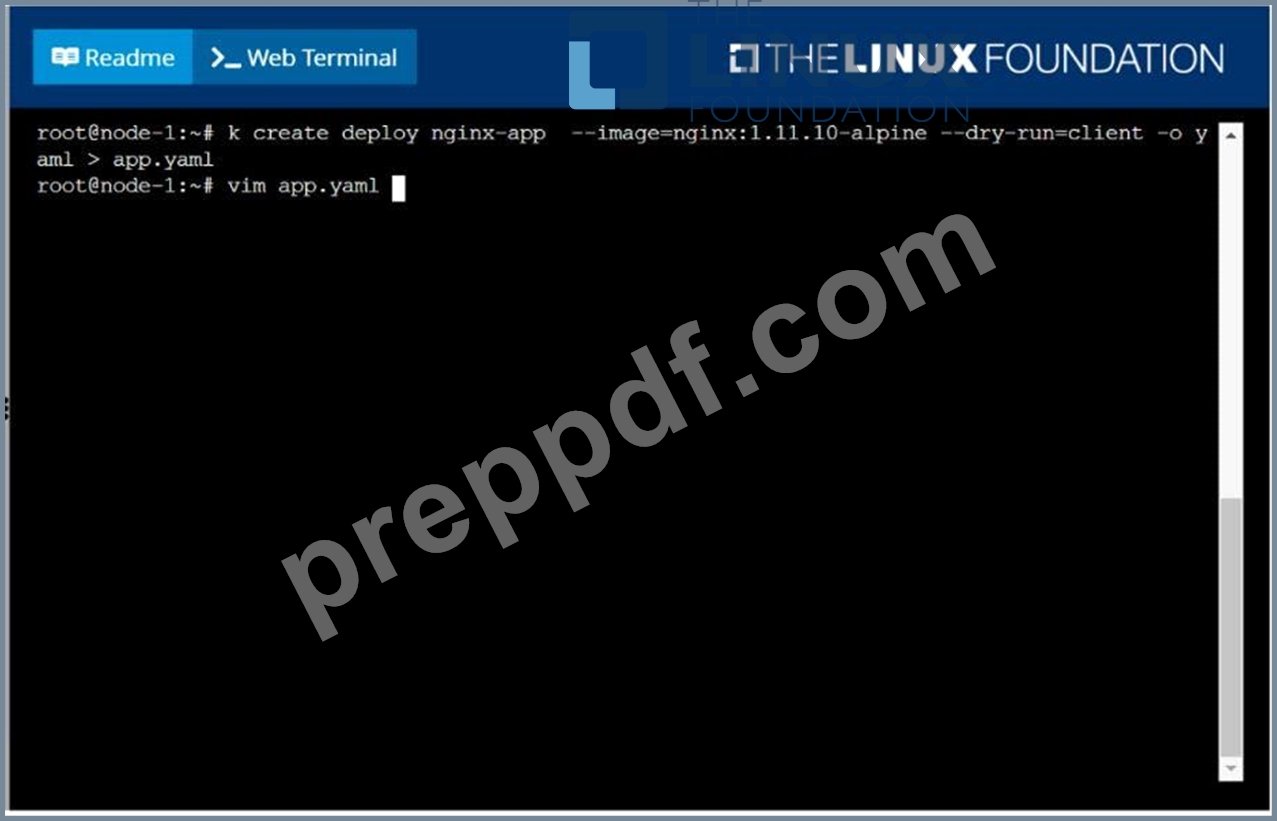
NEW QUESTION # 34
Score: 4%
Task
Scale the deployment presentation
Answer:
Explanation:
See the solution below.
Explanation
Solution:
kubectl get deployment
kubectl scale deployment.apps/presentation --replicas=6
NEW QUESTION # 35
You are running a service that handles requests from multiple pods. How can you scale the service to handle increased traffic without impacting the service availability during the scaling process?
Answer:
Explanation:
See the solution below with Step by Step Explanation.
Explanation:
Solution (Step by Step) :
1. Use a Deployment:
- Deploy the service using a Deployment with the desired number of replicas.
2. Define a Service:
- Create a Service that exposes the application to the outside world.
- Use a 'type: LoadBalancer' to distribute traffic across the pods.
3. Implement Horizontal Pod Autoscaler (HPA):
- Create an HPA that monitors the service's CPU usage.
- Configure the HPA to scale the Deployment based on the CPU utilization.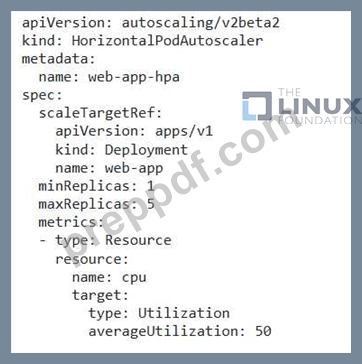
4. Test the Autoscaling: - Simulate increased traffic to the service. - Observe the HPA scaling the Deployment to meet the demand. 5. Monitor the Service: - Monitor the service's performance and ensure that it remains available and stable during scaling. 6. Adjust HPA Configuration: - Fine-tune the HPA configuration to optimize scaling based on specific performance needs.
NEW QUESTION # 36
You have a deployment that uses an init container to perform a specific initialization task before the main application container starts. How can you configure the init container to ensure that it runs successfully before the main container starts, even if the init container fails several times?
Answer:
Explanation:
See the solution below with Step by Step Explanation.
Explanation:
Solution (Step by Step) :
1 . Define the Deployment: Define the deployment with both the init container and main container using a YAML file.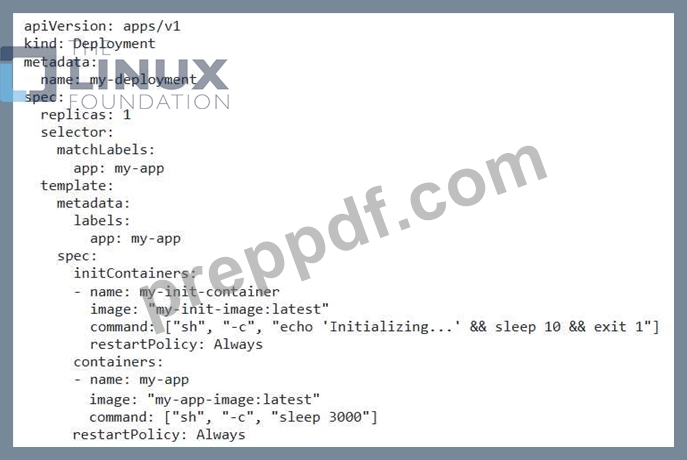
2. Set 'restartPolicy' for the Init Container: Set the 'restartPolicy' for the init container to 'Always'. This ensures that the init container will be restarted if it fails. 3. Set a 'restartPolicy' for the Main Container: Set the 'restartPolicy' for the main container to 'Always' so that the main container is restarted if it fails. 4. Apply the Deployment: Apply the YAML file to your cluster using 'kubectl apply -f my-deployment.yamr. 5. Monitor the Pod: Monitor the pod using 'kubectl get pods -l app=my-app' to check if the init container is running and completing successfully. If the init container repeatedly fails, you will need to troubleshoot the failure. Consider adding more logging to the init container or reducing the number of attempts or increasing the time between attempts to diagnose the root cause.
NEW QUESTION # 37
Label a node as app=test and verify
Answer:
Explanation:
kubectl label node node-name app=test // Verify kubectl get no -show-labels kubectl get no -l app=test
NEW QUESTION # 38
Create 2 nginx image pods in which one of them is labelled with env=prod and another one labelled with env=dev and verify the same.
Answer:
Explanation:
See the solution below.
Explanation
kubectl run --generator=run-pod/v1 --image=nginx -- labels=env=prod nginx-prod --dry-run -o yaml > nginx-prodpod.yaml Now, edit nginx-prod-pod.yaml file and remove entries like "creationTimestamp: null"
"dnsPolicy: ClusterFirst"
vim nginx-prod-pod.yaml
apiVersion: v1
kind: Pod
metadata:
labels:
env: prod
name: nginx-prod
spec:
containers:
- image: nginx
name: nginx-prod
restartPolicy: Always
# kubectl create -f nginx-prod-pod.yaml
kubectl run --generator=run-pod/v1 --image=nginx --
labels=env=dev nginx-dev --dry-run -o yaml > nginx-dev-pod.yaml
apiVersion: v1
kind: Pod
metadata:
labels:
env: dev
name: nginx-dev
spec:
containers:
- image: nginx
name: nginx-dev
restartPolicy: Always
# kubectl create -f nginx-prod-dev.yaml
Verify :
kubectl get po --show-labels
kubectl get po -l env=prod
kubectl get po -l env=dev
NEW QUESTION # 39
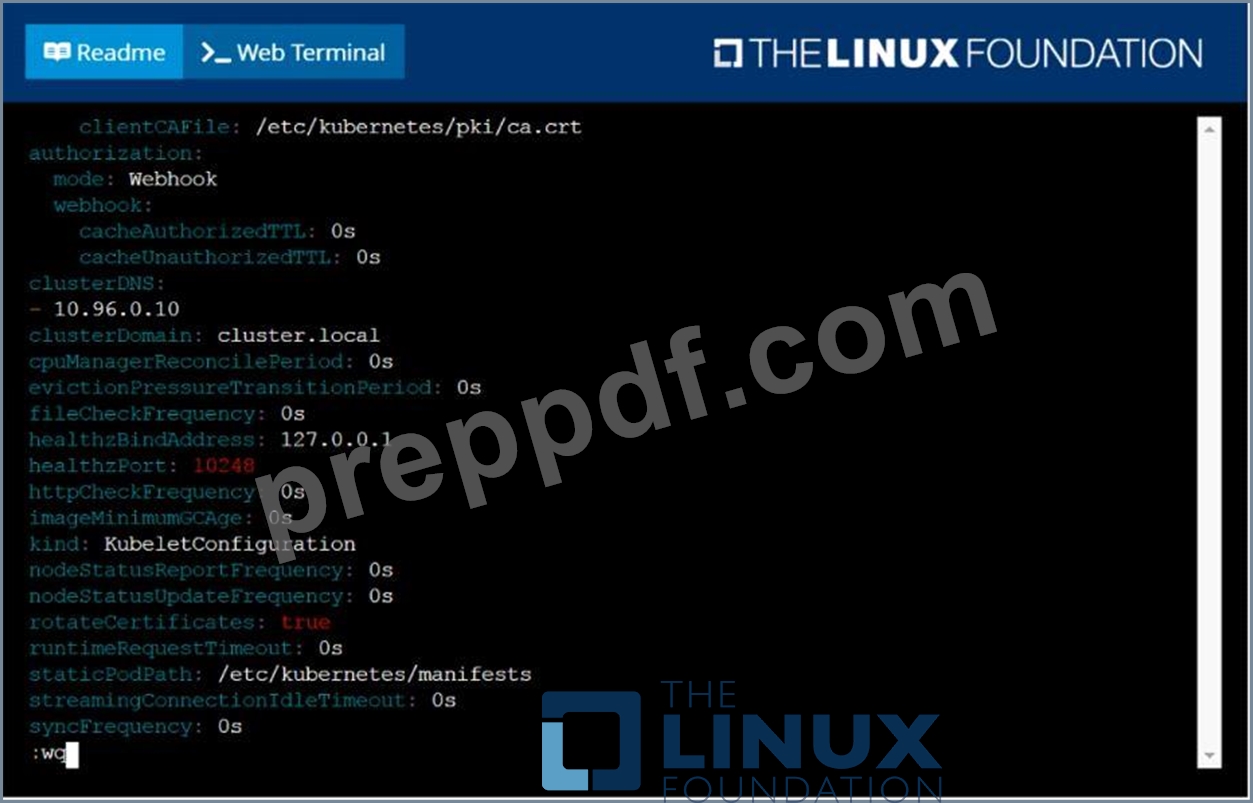
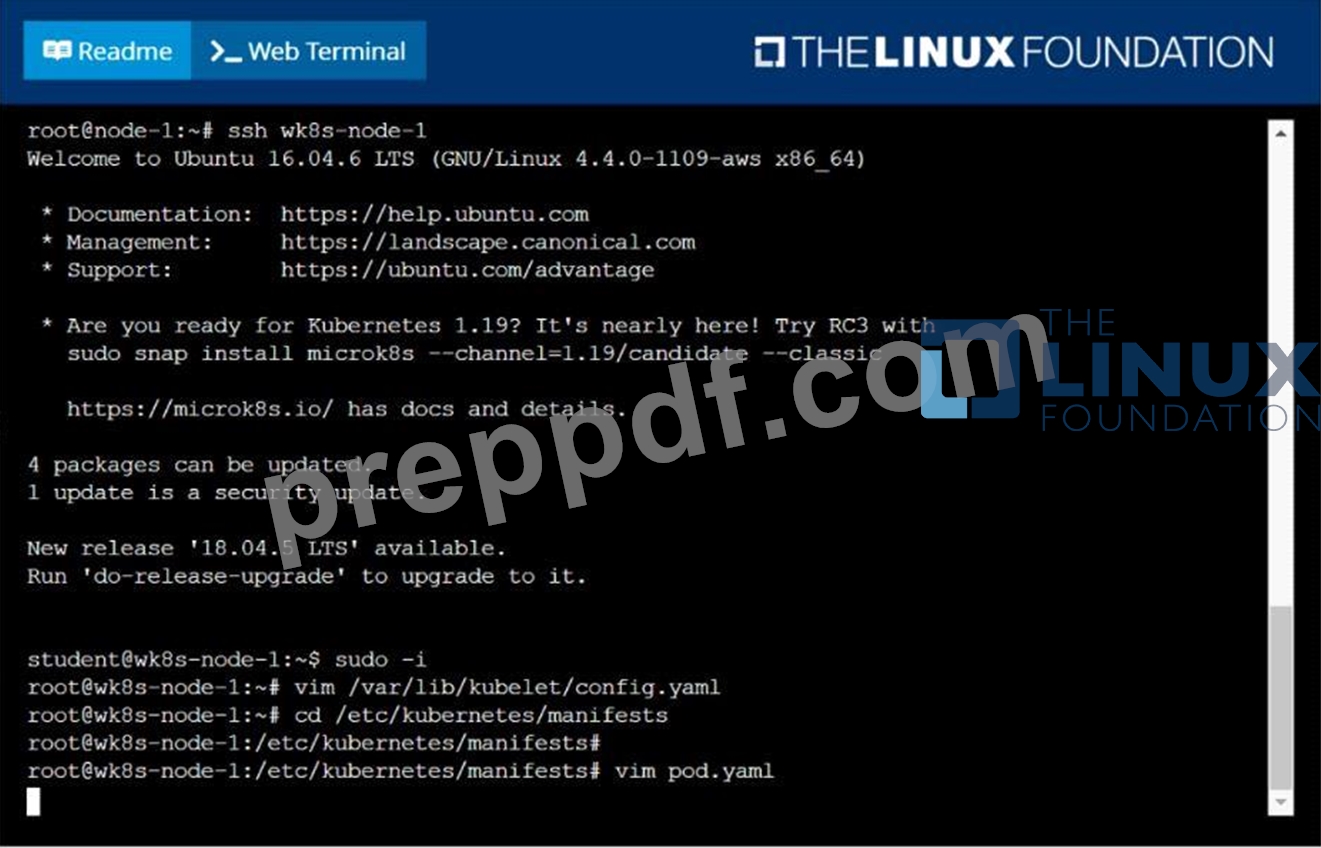
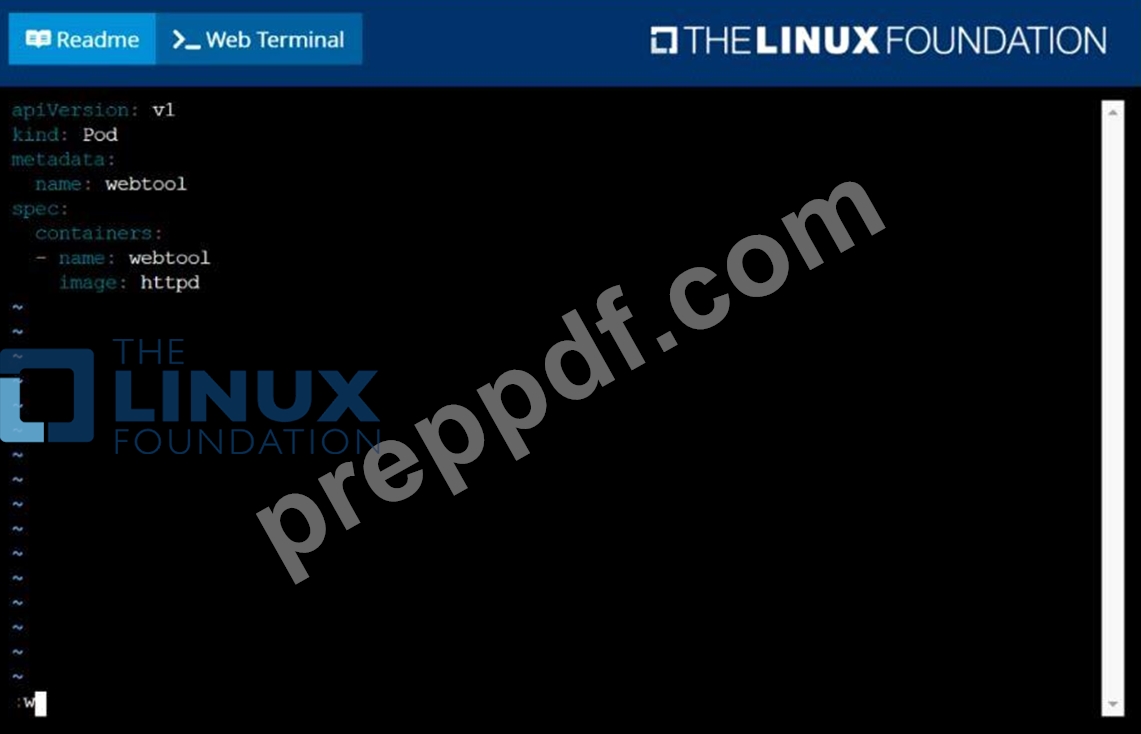
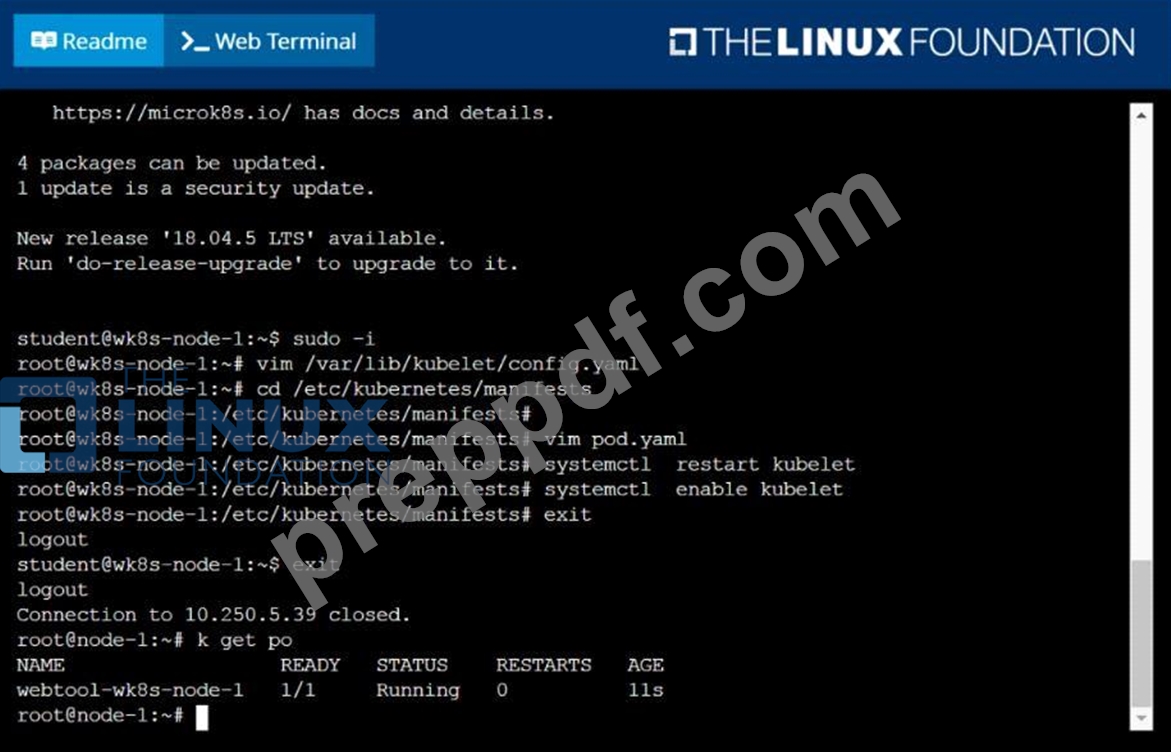
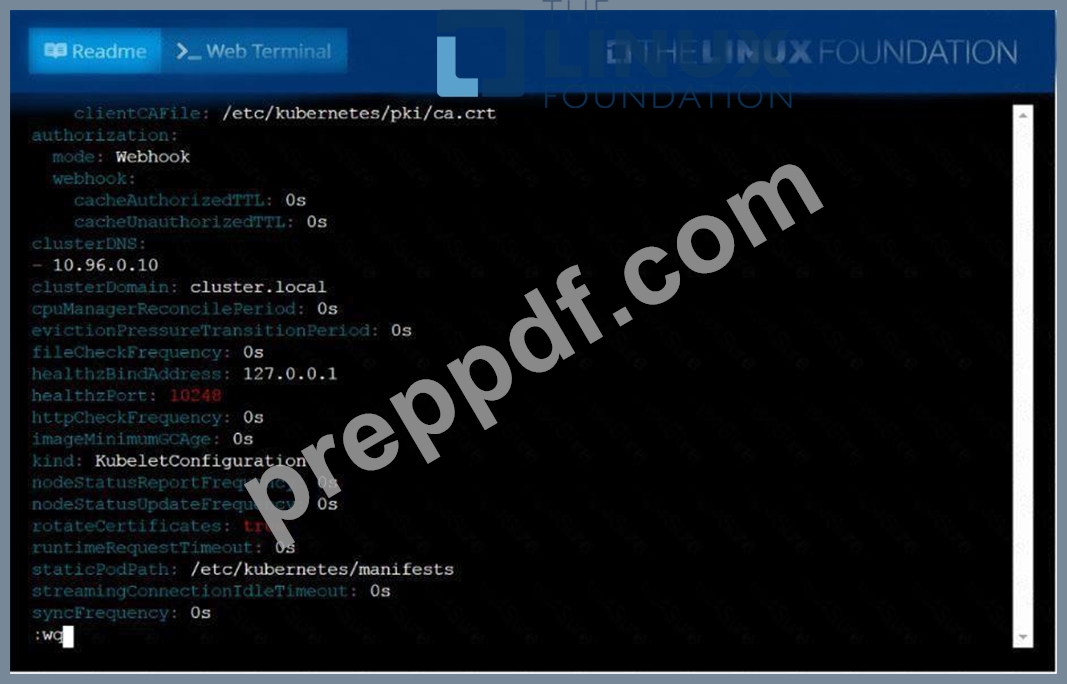
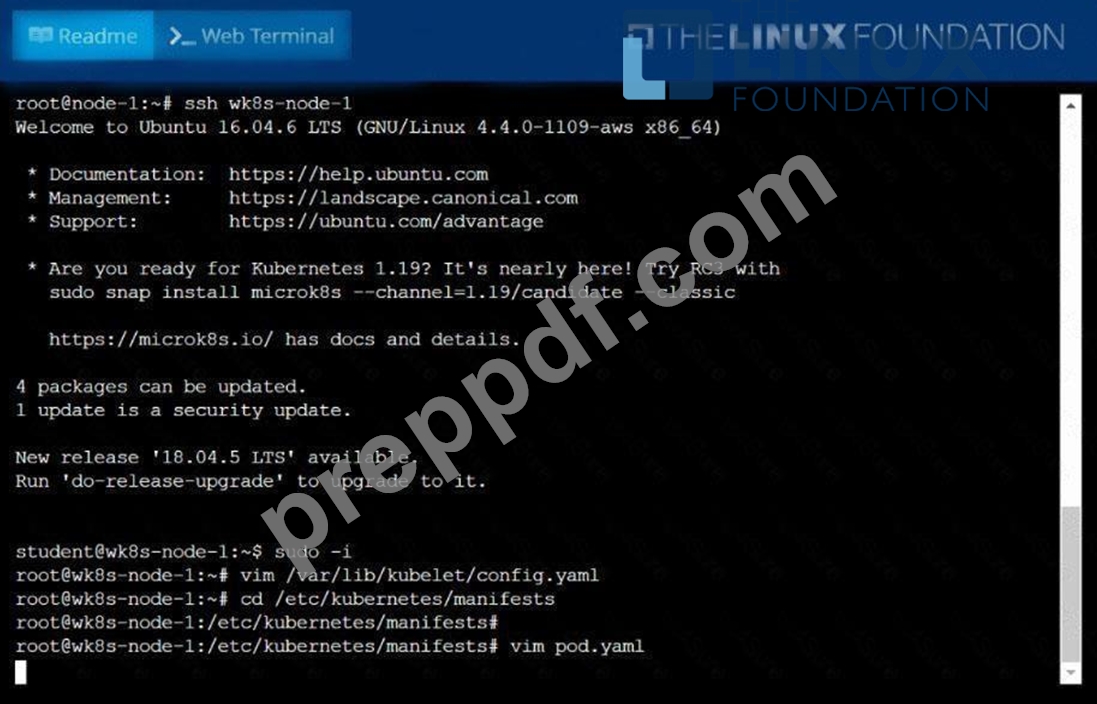
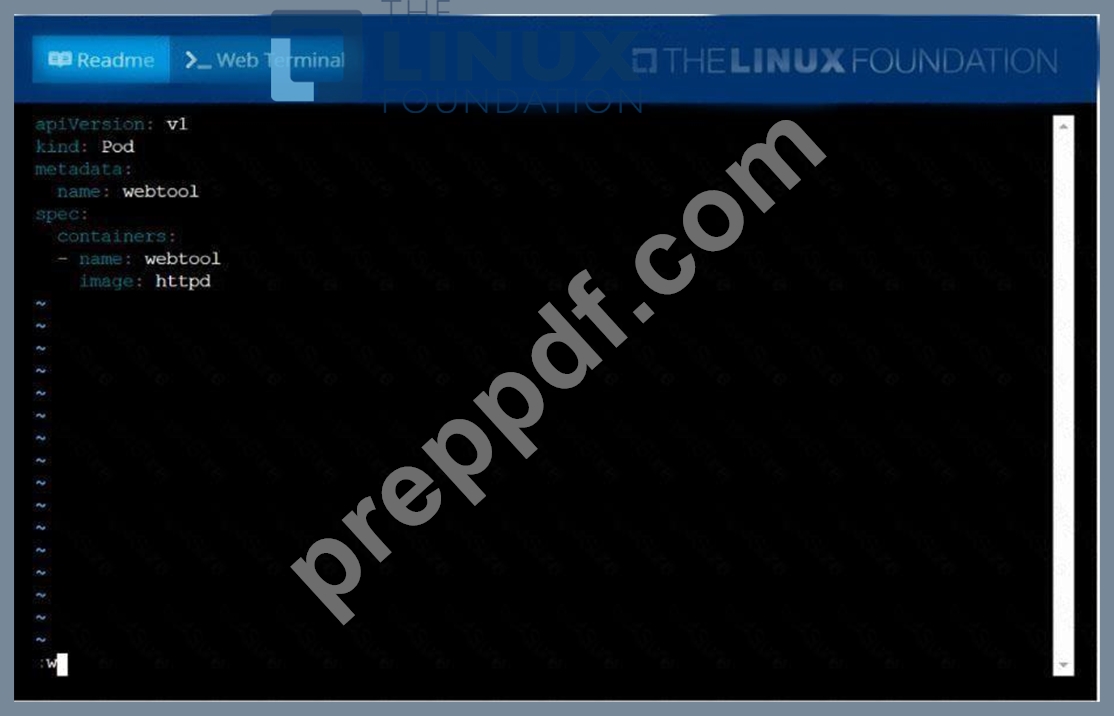
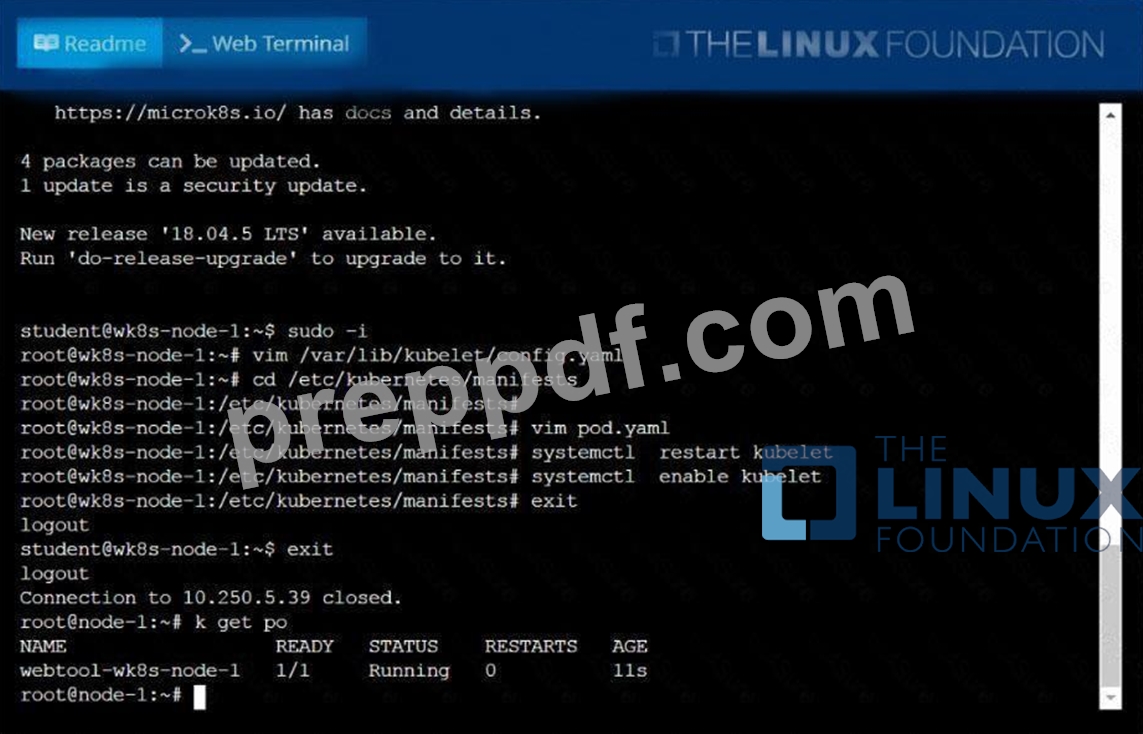
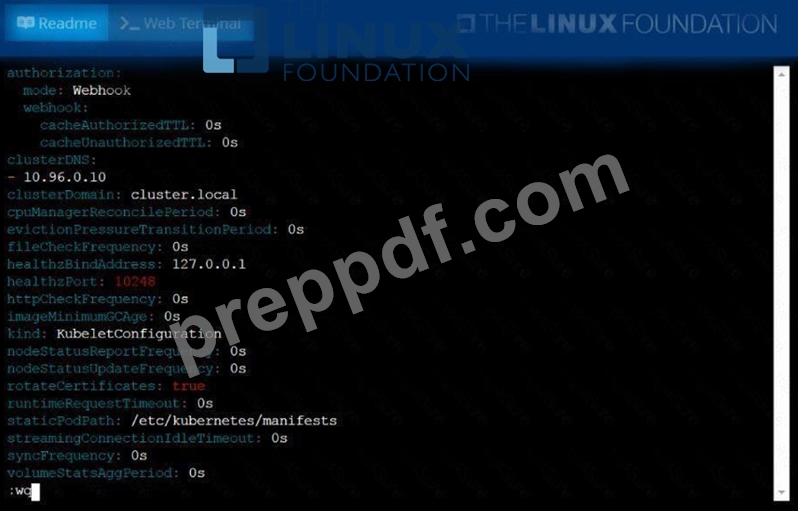
Configure the kubelet systemd- managed service, on the node labelled with name=wk8s-node-1, to launch a pod containing a single container of Image httpd named webtool automatically. Any spec files required should be placed in the /etc/kubernetes/manifests directory on the node.
You can ssh to the appropriate node using:
[student@node-1] $ ssh wk8s-node-1
You can assume elevated privileges on the node with the following command:
[student@wk8s-node-1] $ | sudo -i
Answer:
Explanation:
solution
NEW QUESTION # 40
Score: 4%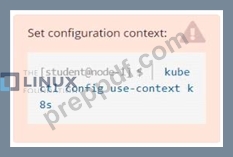
Task
Check to see how many nodes are ready (not including nodes tainted NoSchedule ) and write the number to /opt/KUSC00402/kusc00402.txt.
Answer:
Explanation:
Solution:
kubectl describe nodes | grep ready|wc -l
kubectl describe nodes | grep -i taint | grep -i noschedule |wc -l
echo 3 > /opt/KUSC00402/kusc00402.txt
#
kubectl get node | grep -i ready |wc -l
# taints、noSchedule
kubectl describe nodes | grep -i taints | grep -i noschedule |wc -l
#
echo 2 > /opt/KUSC00402/kusc00402.txt
NEW QUESTION # 41
For this item, you will have to ssh and complete all tasks on these
nodes. Ensure that you return to the base node (hostname: ) when you have completed this item.
Context
As an administrator of a small development team, you have been asked to set up a Kubernetes cluster to test the viability of a new application.
Task
You must use kubeadm to perform this task. Any kubeadm invocations will require the use of the
--ignore-preflight-errors=all option.
Configure the node ik8s-master-O as a master node. .
Join the node ik8s-node-o to the cluster.
Answer:
Explanation:
See the solution below.
Explanation
solution
You must use the kubeadm configuration file located at /etc/kubeadm.conf when initializingyour cluster.
You may use any CNI plugin to complete this task, but if you don't have your favourite CNI plugin's manifest URL at hand, Calico is one popular option:
https://docs.projectcalico.org/v3.14/manifests/calico.yaml
Docker is already installed on both nodes and apt has been configured so that you can install the required tools.
NEW QUESTION # 42
Configure the kubelet systemd- managed service, on the node labelled with name=wk8s-node-1, to launch a pod containing a single container of Image httpd named webtool automatically. Any spec files required should be placed in the /etc/kubernetes/manifests directory on the node.
You can ssh to the appropriate node using:
[student@node-1] $ ssh wk8s-node-1
You can assume elevated privileges on the node with the following command:
[student@wk8s-node-1] $ | sudo -i
Answer:
Explanation:
See the solution below.
Explanation
solution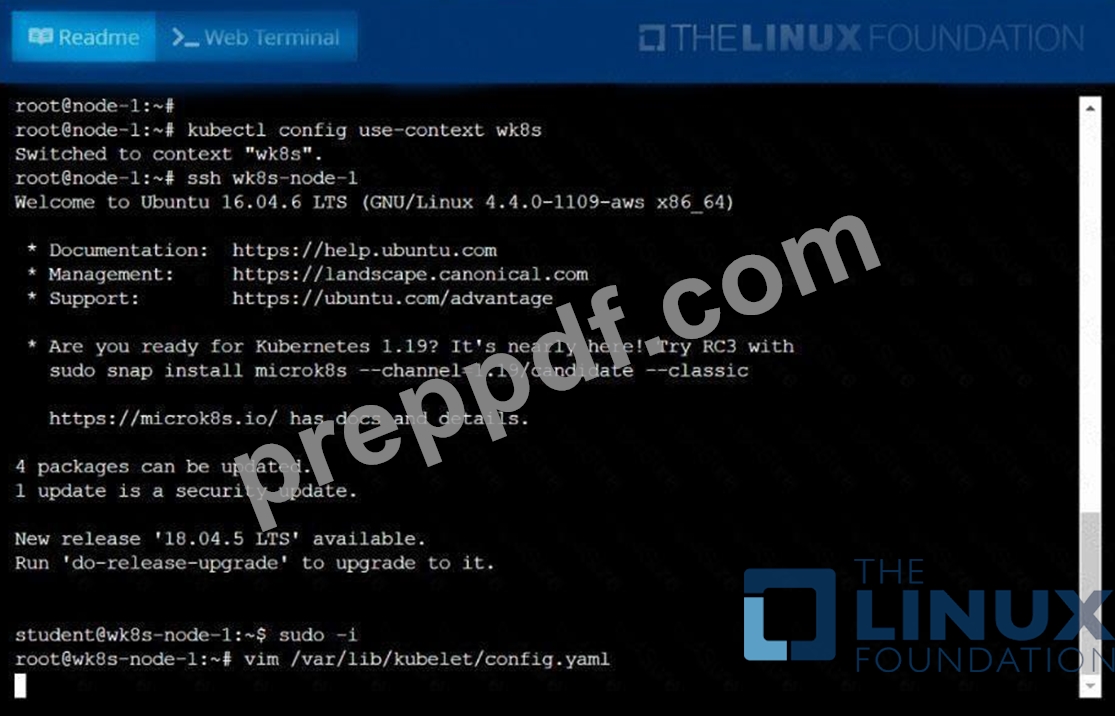
NEW QUESTION # 43
You have a Kubernetes cluster with a multi-tenant setup where different teams manage their own applications. You need to enforce a policy where only developers from the "engineering" team can create deployments for applications within the "dev" namespace. How would you implement this using RBAC?
Answer:
Explanation:
See the solution below with Step by Step Explanation.
Explanation:
Solution (Step by Step) :
Step 1: Create a Role for the "engineering" team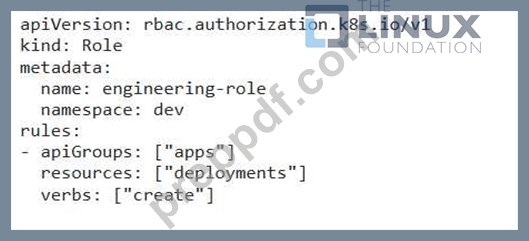
Step 2: Create a RoleBinding to assign the role to the "engineering" team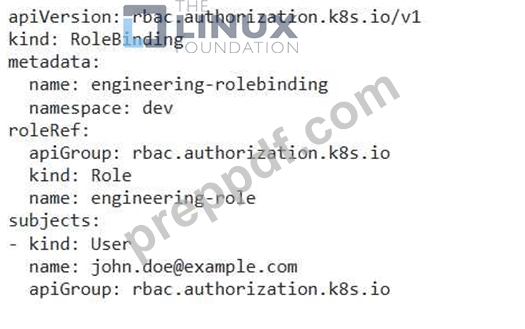
- The Role defines the permissions for the "engineering" team, allowing them to create deployments in the "dev" namespace. - The RoleBinding associates the "engineering-role" with the user "[email protected]" (representing a developer from the "engineering" team). Step 3: Validate the setup - A developer from the "engineering" team should be able to create deployments in the "dev" namespace. - Other users or teams without the appropriate permissions should be prevented from creating deployments in the "dev" namespace.
NEW QUESTION # 44
You are running a Kubernetes cluster with a critical application that requires high availability and resilience. You have a Deployment named 'web-app' with multiple replicas. Your current DNS setup relies on external DNS providers, but you want to implement CoreDNS within your cluster to enhance DNS resolution performance and reliability. You need to configure CoreDNS to resolve DNS queries for services within the cluster and for external domains.
Answer:
Explanation:
See the solution below with Step by Step Explanation.
Explanation:
Solution (Step by Step) :
1 Create a CoreDNS ConfigMap:
- Create a ConfigMap named coredns' containing the CoreDNS configuration. You can use a basic configuration file or a more complex one tailored to your specific needs.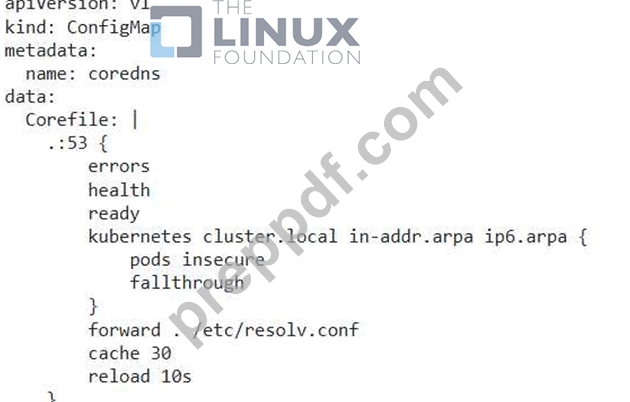
2. Deploy CoreDNS: - Deploy CoreDNS as a Deployment using the 'coredns' ConfigMap.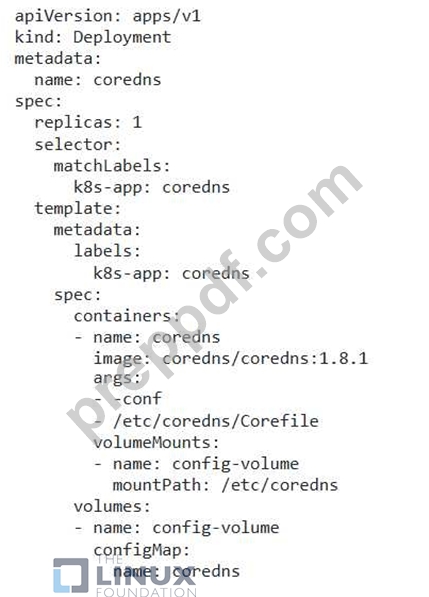
3. Configure Services for DNS Resolution: - Create a Service named 'coredns' of type 'ClusterlP' that exposes the CoreDNS Deployment on the cluster network.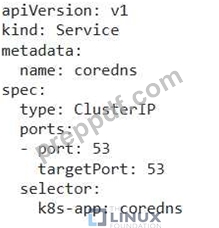
4. Update Cluster DNS Configuration: - Modify the 'kube-system namespace 'ConfigMap' named 'cluster-dns' to point to the 'coredns' Service for DNS resolution.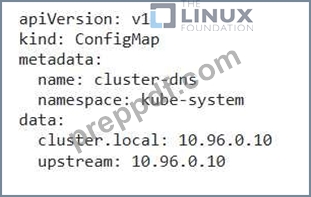
5. Verify CoreDNS Functionality: - Use 'kubectl exec -it -- sh -c "nslookup ..svc.cluster.local"' to test DNS resolution for services within the cluster. - Use "kubectl exec -it sh -c "nslookup example.com"' to test DNS resolution for external domains. - If everything is configured correctly, CoreDNS should successfully resolve DNS queries.
NEW QUESTION # 45
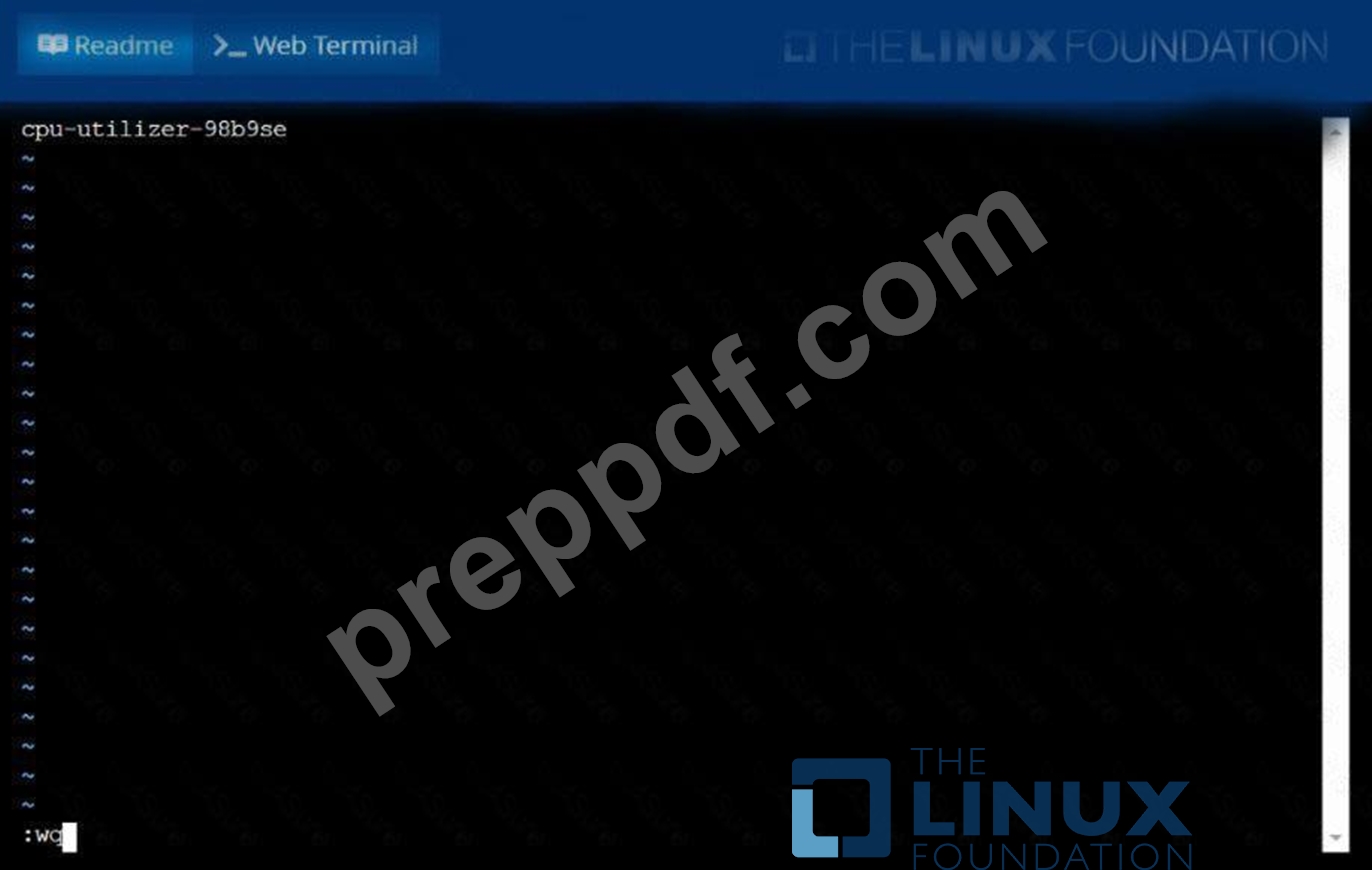
From the pod labelname=cpu-utilizer, find podsrunning high CPU workloads and write the name of the pod consumingmost CPU to thefile/opt/KUTR00102/KUTR00102.txt(which already exists).
Answer:
Explanation:
See the solution below.
Explanation
solution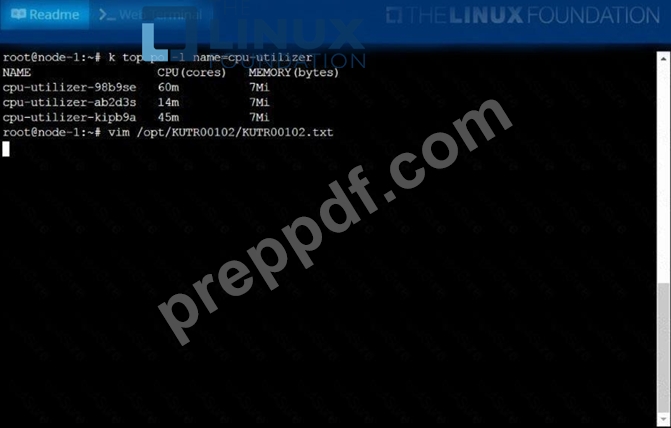
NEW QUESTION # 46
You have a Kubernetes cluster with three nodes. You need to create a Role that allows users in the "developers" group to access the "nginx-deployment" deployment in the "default" namespace. This role should only permit users to view and update the deployment, not delete it.
Answer:
Explanation:
See the solution below with Step by Step Explanation.
Explanation:
Solution (Step by Step) :
1. Create the Role: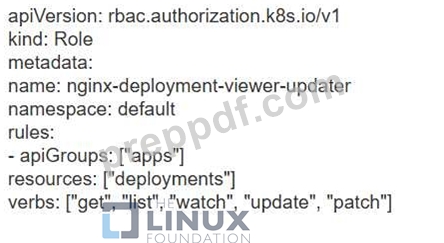
2. Create the RoleBinding: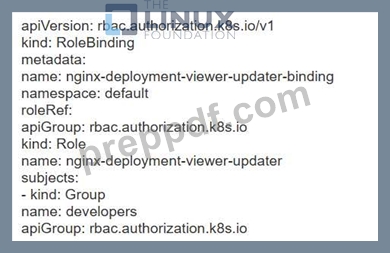
3. Apply the Role and RoleBinding: bash kubectl apply -f role.yaml kubectl apply -f rolebinding.yaml
NEW QUESTION # 47
Scale the deployment to 5 replicas
Answer:
Explanation:
kubectl scale deployment webapp -replicas=5 //Verify kubectl get deploy kubectl get po,rs
NEW QUESTION # 48
You are running a Kubernetes cluster with a NodePort service exposing a web application on port 80. You want to access the web application from a client machine outside the cluster. However, the client machine is behind a NAT gateway and you cannot directly configure firewall rules on the gateway. How can you configure the Kubernetes cluster to allow the client machine to access the web application?
Answer:
Explanation:
See the solution below with Step by Step Explanation.
Explanation:
Solution (Step by Step) :
1. Create a NodePort Service:
- Create a NodePort service that exposes port 80 of the web application on a specific NodePort (for example,
30080).
- Code: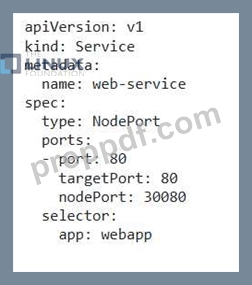
2. Configure NAT Gateway: - Configure the NAT gateway to forward traffic from the client machine's IP address and port to the Kubernetes cluster's IP address and the NodePort. - Note: This configuration will depend on the specific NAT gateway and its configuration options. 3. Access the Application: - On the client machine, access the web application by using the Kubernetes cluster's IP address and the NodePort. - Example: 'http://:30080'
NEW QUESTION # 49
Your organization uses a private DNS server for internal services and requires all Kubernetes pods to resolve names against this DNS server. You need to configure CoreDNS to forward all DNS requests to this private server.
Answer:
Explanation:
See the solution below with Step by Step Explanation.
Explanation:
Solution (Step by Step) :
1 . Configure CoreDNS with Forwarding:
- In the CoreDNS ConfigMap, configure the 'forward' plugin to forward all DNS requests to your private DNS server.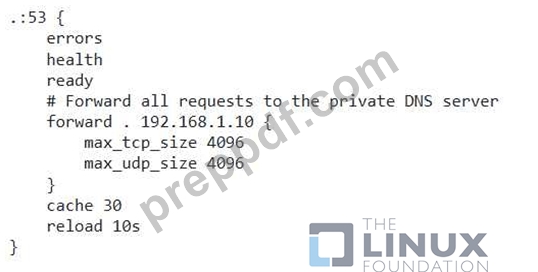
2. Test DNS Resolution: - Use the 'nslookup' command from a pod in your cluster to test DNS resolution for internal services. - The requests should be forwarded to the private DNS server, and the corresponding records should be returned.
NEW QUESTION # 50
Create a Pod with three busy box containers with commands "ls; sleep 3600;", "echo Hello World; sleep 3600;" and "echo this is the third container; sleep 3600" respectively and check the status
- A. // first create single container pod with dry run flag
kubectl run busybox --image=busybox --restart=Always --dry-run
-o yaml -- bin/sh -c "sleep 3600; ls" > multi-container.yaml
// edit the pod to following yaml and create it
apiVersion: v1
kind: Pod
metadata:
labels:
run: busybox
name: busybox
spec:
containers:
- args:
- bin/sh
- -c
- ls; sleep 3600
image: busybox
name: busybox-container-1
- args:
- bin/sh
- -c
- echo Hello world; sleep 3600
image: busybox
name: busybox-container-2
- args:
- bin/sh
- -c
- echo this is third container; sleep 3600
image: busybox
name: busybox-container-3
restartPolicy: Always
// Verify
Kubectl get pods - B. // first create single container pod with dry run flag
kubectl run busybox --image=busybox --restart=Always --dry-run
-o yaml -- bin/sh -c "sleep 3600; ls" > multi-container.yaml
// edit the pod to following yaml and create it
apiVersion: v1
kind: Pod
metadata:
labels:
run: busybox
name: busybox
spec:
containers:
- args:
- bin/sh
- -c
- ls; sleep 3600
- echo Hello world; sleep 3600
image: busybox
name: busybox-container-2
- args:
- bin/sh
- -c
- echo this is third container; sleep 3600
image: busybox
name: busybox-container-3
restartPolicy: Always
// Verify
Kubectl get pods
Answer: A
NEW QUESTION # 51
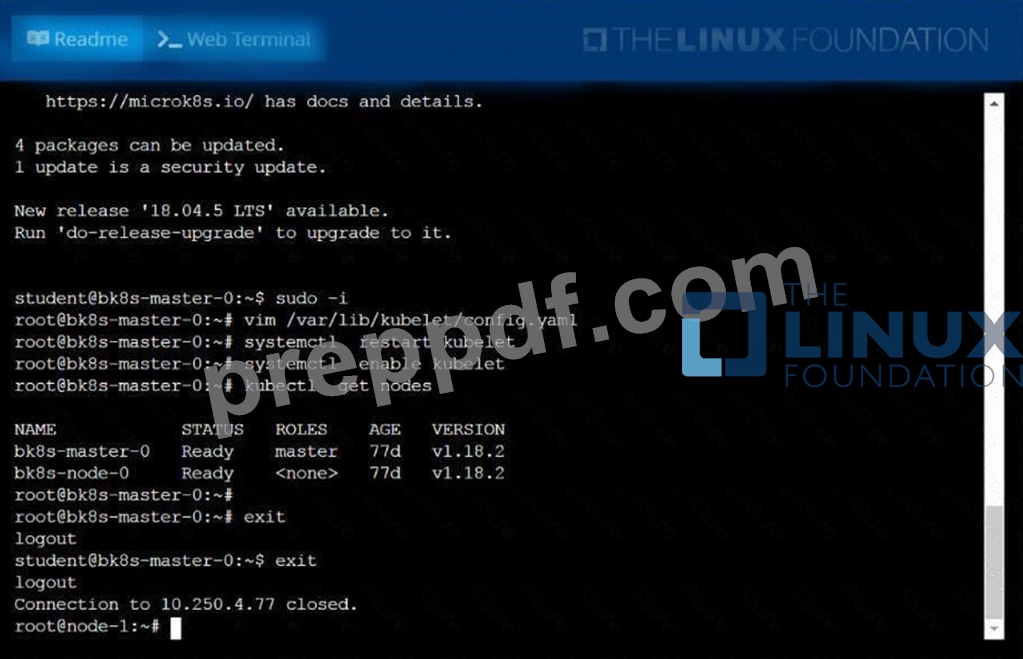
Given a partially-functioningKubernetes cluster, identifysymptoms of failure on the cluster.
Determine the node, the failingservice, and take actions to bring upthe failed service and restore thehealth of the cluster. Ensure that anychanges are made permanently.
You cansshto the relevant Inodes (bk8s-master-0orbk8s-node-0) using:
[student@node-1] $ ssh<nodename>
You can assume elevatedprivileges on any node in thecluster with the followingcommand:
[student@nodename] $ | sudo -i
Answer:
Explanation:
See the solution below.
Explanation
solution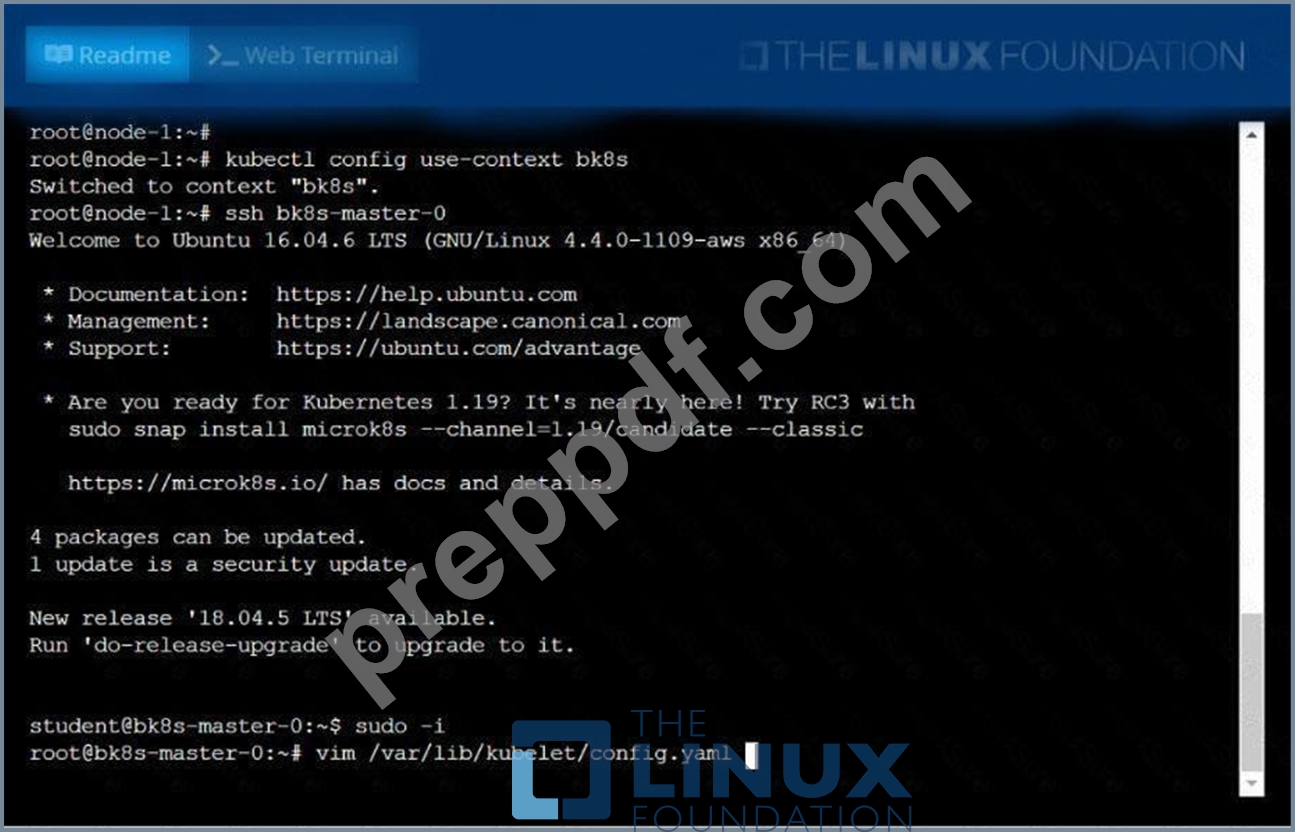
NEW QUESTION # 52
......
Difficulty in Attempting CNCF CKA Certification Exam
There are different levels of difficulty in taking the CNCF Certified Kubernetes Administrator exam. The first level is categorized as being easy, which is where it can be taken by beginners who have just recently started to learn about the subject. The second level is categorized as being moderate, which will require some knowledge about the material that will be tested on. Most of this information will likely come from various classes that students have had in school or from reading books. The last level of difficulty is categorized as being hard, which requires a lot more knowledge on the material that will be tested for this examination. Students can expect to take many classes and read many books before attempting this examination with the possibility of not passing it.
Health benefits are something that students will need to look into before attempting the CNCF CKA Certification Exam. They may be able to get a free physical examination that can help them determine if they are healthy enough to attempt the CNCF CKA Certification Exam. Field Experts will be able to attempt the CNCF CKA Certification Exam. Create your own demos before attempting the CNCF CKA Certification Exam. Basic knowledge revolves around Kubernetes. Helpful hints will be available during the exam. CNCF CKA exam dumps are the best option to pass the exam. The CNCF CKA certification exam will be beneficial to candidates with an interest in Kubernetes development. Find other options for people who want to get certified. Practice exam and understanding exams and flashcards will be prepared by experts who can prepare for the CNCF CKA Certification Exam. Helpful hints will be available during the exam. Container work will be used by IT engineers. Experience the basics of Kubernetes and container management before attempting the CNCF CKA Certification Exam. Try to set up a demo environment before attempting the CNCF CKA Certification Exam.
CKA dumps Sure Practice with 85 Questions: https://passcertification.preppdf.com/Linux-Foundation/CKA-prepaway-exam-dumps.html